How to Create a "Badass Links Page" with 3D Motion Background Using Vanta.js
As a former Paratrooper Medic and Mass Casualty Coordinator, I made the leap into software engineering. Through my journey, I've continued to grow and learn, and I'm eager to share my knowledge with others. As a self-taught software engineer, I'm passionate about empowering others to pursue their dreams and learn new skills.
GitHub Repository: https://github.com/PSkinnerTech/badass-links-page
Demo Link: https://links.patrickskinner.tech

Required Knowledge For this Project:
HTML: Basic Understanding
CSS: Basic Understanding
Javascript: "I know what it is, but I've never used it before."
Intro:
This is a comprehensive tutorial on how to create a "Link in Bio" / "Linktree Clone" / "Badass Links Page". The only requirement that will not be discussed in this in this tutorial is to have a text editor. I personally use vsCode, but any text editor will work. For you to follow along exactly with what is detailed, I recommend using vsCode if you don't currently have one picked out.
Without any further ado, let's get into the tutorial:
Step-By-Step Guide
Step: 1 - Create your work environment
Create a folder that will be your working environment.
Open your folder in your preferred text editor.
Create the necessary files:
Index.html
style.css
Note: We're not going to use an image folder for the sole purpose of keeping this website as light as possible. We'll be using a decentralized file storage app called AKORD to source all of our image.
Step 2: Create your HTML Wire Frame
*Create your HTML wireframe starting with <!DOCTYPE html>.
<!DOCTYPE html>
<html>
  <head>
  </head>
  <body>
    <main>
      <header>
      </header>
      <ul>
        <li></li>
        <li></li>
        <li></li>
        <li></li>
        <li></li>
        <li></li>
        <li></li>
      </ul>
    </main>
  </body>
</html>
Defining Tags:
<!DOCTYPE html>is an HTML (Hypertext Markup Language) declaration or document type declaration that specifies the version of HTML used in a web page. It is usually placed at the beginning of an HTML document and informs the web browser how to interpret the code that follows. It helps ensure that the web page is displayed correctly and consistently across different browsers and devices.<html>is an HTML element that serves as the root element of an HTML document. It is the container for all other HTML elements, and its opening and closing tags enclose all the content of the web page, including the head and body sections. The HTML code inside the<html>element describes the structure and content of the web page and is interpreted by web browsers to display the web page to users.<head>is an HTML element that is used to contain the metadata of a web page. This metadata includes information such as the title of the web page, links to external stylesheets and scripts, and other information that helps web browsers properly render the content of the web page. The<head>element is not visible on the web page and is usually located between the<html>and<body>elements.<body>is an HTML element that represents the main content of a web page that is visible to users. It contains all the content that is displayed on the web page, such as text, images, videos, forms, and more. The<body>element is located between the opening and closing tags of the<html>element and is typically the largest section of an HTML document. It is the part of the web page that users interact with and is rendered by web browsers to display the content to users.<header>is an HTML element that is used to represent the introductory content or navigation links at the top of a web page. It is typically used to display the logo, site title, and primary navigation links of a website. The<header>element is usually located at the top of the<body>section of an HTML document, but it can also be used within other sections of the page. It is a semantic element that helps search engines and screen readers better understand the content and structure of the web page.<main>is an HTML element that is used to represent the main content of a web page. It contains the primary content that is unique to the web page and should not be repeated across multiple pages. The<main>element is typically used to enclose the main article, section, or other content areas of a web page. It is a semantic element that helps search engines and screen readers better understand the structure and purpose of the web page. The<main>element should only be used once per page and should not be nested within other semantic elements like<article>or<section>.<ul>is an HTML element that is used to create an unordered list of items. It stands for "unordered list" and is used to group together related items in no particular order. The items are usually represented as bullet points, but the appearance can be customized with CSS. Each item in the list is represented by an<li>(list item) element, which is nested within the<ul>element. The<ul>element can also be nested within other list elements, such as<ol>(ordered list), to create more complex list structures.<li>is an HTML element that is used to represent an item in a list. It stands for "list item" and is typically used within<ul>(unordered list) or<ol>(ordered list) elements to create a bulleted or numbered list of items. Each<li>element contains the content of the list item, such as text, images, or links. The<li>element can also be used within other contexts, such as navigation menus, where it represents a menu item.
Step 3: Fill in your <head> tags:
- Add these 4 separate lines to your
<head>tags:
  <head>
    <meta charset="utf-8" />
    <meta name="'viewport" content="width=device-width, initial-scale=1" />
    <link rel="stylesheet" href="style.css" />
    <title>[Insert Name Here]'s Badass Links Page</title>
  </head>
Defining your <head> tags baseline:
<meta charset="utf-8" />is a HTML tag that specifies the character encoding for the document. The charset attribute tells the browser what character encoding the document is using, which is important for displaying text correctly. Theutf-8value is a widely-used character encoding that supports a wide range of characters and is recommended for use in modern web development.<meta name="'viewport" content="width=device-width, initial-scale=1" />is a HTML tag that sets the viewport, which is the visible area of a web page, on mobile devices. Thewidth=device-widthvalue sets the width of the viewport to the width of the device's screen, whileinitial-scale=1sets the initial zoom level to 100%, which is typically what users expect when viewing a web page on their mobile device. This tag is important for ensuring that the layout and content of a web page are displayed properly on mobile devices with different screen sizes and resolutions.<link rel="stylesheet" href="style.css" />is a HTML tag used to link an external CSS file to a web page. The rel attribute specifies the relationship between the current document and the linked resource, in this case, a stylesheet. The href attribute specifies the path to the CSS file that contains the styles to be applied to the web page. By using this tag, the styles defined in the linked CSS file can be applied to the HTML elements of the web page, allowing for better control over the visual appearance of the web page.
Step 4: Begin Filling your <body> tags
- Inside the
<body>-><main>-><header>, add:<h1>Your Name</h1>
<header>
    <h1>Your Name</h1>
</header>
- Inside the
<body>-><main>-><ul>-><li>tags add:
      <ul>
        <li>
          <a>Personal Website</a>
        </li>
        <li>
          <a>Youtube</a>
        </li>
        <li>
          <a>Twitter</a>
        </li>
        <li>
          <a>GitHub</a>
        </li>
        <li>
          <a>Linkedin</a>
        </li>
        <li>
          <a>My Blog</a>
        </li>
        <li>
          <a>Buy Me Coffee</a>
        </li>
      </ul>
Note: You don't have to add all of these if you're building this for your use. Use whatever you deem necessary
New Tag Definitions:
<a>is a HTML tag used to create a hyperlink to another webpage or resource. Theastands for "anchor" and it is often used to create clickable links on web pages. Thehrefattribute is used to specify the destination of the link, which could be a web page, a file, an email address, or any other resource on the web. When a user clicks on the link, they will be taken to the destination specified in thehrefattribute.
Step 6: Importing Font-Awesome Icons
Go to this website: https://cdnjs.com/libraries/font-awesome
Find the very first font-awesome library link that ends in
/css/all.min.css, then click the</>icon to copy the import syntaxPaste the import syntax in your
<head>tags.
  <head>
    <meta charset="utf-8" />
    <meta
        name="'viewport"
        content="width=device-width, initial-scale=1"
    />
    <link rel="stylesheet" href="style.css" />
    <link
      rel="stylesheet"
      href="https://cdnjs.cloudflare.com/ajax/libs/font-                                                awesome/6.3.0/css/all.min.css"
      integrity="sha512-SzlrxWUlpfuzQ+pcUCosxcglQRNAq/DZjVsC0lE40xsADsfeQoEypE+enwcOiGjk/bSuGGKHEyjSoQ1zVisanQ=="
      crossorigin="anonymous"
      referrerpolicy="no-referrer"
    />
    <title>[Insert Name Here]'s Badass Links Page</title>
  </head>
What this does is that it gives us access to all of the free Font-Awesome icons that we could ever want to use for our website.
Go to this website: https://fontawesome.com/search
Click the "Free" button that has a lightning bolt icon.
Search for the icon you want to add to the first link.
By default, it will show you the HTML syntax. Click on the syntax once to copy it.
past the syntax inside of the
<a>tags you want the icon to be associated with.
Do this for every link you want an icon for.
New Definitions
<i>is an HTML tag used to format text in italics. Theistands for "italic" and it is used to indicate that the enclosed text should be displayed in a slanted or cursive font style. However, it is important to note that the use of the<i>tag has been deprecated in favor of using the<em>tag to indicate emphasis, as it provides better semantic meaning to the text.
STEP 7: Add Hyperlinks to Each <li>
To have the links work, we need to add an href inside each a tag inside the li tag.
- Inside each <a> tag, add a
href="#".
        <li>
          <a href="https://patrickskinner.tech"
            ><i class="fa-solid fa-globe" alt="Homepage" width="20">
            </i>
            Official Website
          </a>
        </li>
Note: If you want the links to open on a page in a new tab, add target="_blank" inside the a tag after the href.
        <li>
          <a href="https://patrickskinner.tech" target="_blank"
            ><i class="fa-solid fa-globe" alt="Homepage" width="20">
            </i>
            Official Website
          </a>
        </li>
STEP 8: Add an Image to the <header>
We're going to use a decentralized file storage application called AKORD.
Create an account here: https://akord.com/products/web-app
Set up a PUBLIC folder.
Place your preferred PFP in the public folder either with the upload button or with drag or drop. Note: I recommend the image be square in dimensions no more than 400x400 pixels.
IMPORTANT:
The reason why we're using AKORD is that it's a great place to establish website images. You'll never need to pay for the storage monthly and it's stored on the Arweave Blockchain. So, no matter what, the image will always display on the website and you'll avoid storage server issues, payment issues, etc. Now, because it's stored on the blockchain, establishing a working link is slow. Once you upload the image, there will be an orange dot next to the image title. That orange dot means the image is still being stored on the Arweave Blockchain and you won't have a working link for it yet. the process takes roughly 30 mins before it's ready.
Once the orange dot has disappeared, copy the image address by right-clicking the image and clicking 'copy image address'.
Go back to the HTML file and, within the
<header>tag just before the<h1>tag, add this:<img src="" />Inside the
src=""inside the double quotes, add the image address that you copied from AKORD.
      <header>
        <img
          src="https://arweave.net/#"
        />
        <h1>Your Name</h1>
      </header>
Tag Definition
<img />is an HTML tag used to insert an image into a web page. Theimgstands for "image" and it is a self-closing tag, meaning that it doesn't require a closing tag. Thesrcattribute is used to specify the URL or file path of the image to be displayed on the web page. Other attributes, such asaltandtitlecan be used to provide a description and additional information about the image for accessibility and SEO purposes.
Step 9: Begin Styling with CSS
Open your 'style.css' file in your text editor.
Style your body & HTML tags with these settings:
body,
html {
  margin: 0;
  padding: 0;
  font-family: "Open Sans", sans-serif;
}
- Style your header tags with these settings:
header {
  margin-top: 1em;
  text-align: center;
  display: flex;
  flex-direction: column;
  align-items: center;
}
STEP 10: Stylizing the Profile Picture
In this section, we're going to use an SVG Shape Generator from Softr.io.
Go to this website: https://www.softr.io/tools/svg-shape-generator
Use the tool to create a shape you'd like to have as the frame of your PFP.
Once created, download the SVG file (don't copy it).
With the file downloaded, go to this website: https://base64.guru/
At the top navbar, mouse over "Converter", then "Base64 Encode", then "Image", then click on "SVG".
Change the output to "Data URI -- data:content/type;base64"
Upload the SVG file you downloaded from Softr.io.
Click "Encode SVG to Base64".
A code will appear in a text box labeled "Base64", copy the entire code.
Go back to your text editor and into the style.css file. Create this CSS declaration block.
header > img {
  width: 10em;
  height: 10em;
  -webkit-mask-image: url();
}
- Inside the parenthesis of the
url(), paste the code you copied from Base64.guru.
Once completed, this will reshape the container of your PFP to the style that you created in the SVG Shape Generator from Softr.io.

STEP 11: Stylizing your H1
We're going to stylize your H1 to have a pill-shaped container with a white border.
- Create a new CSS declaration box in your style.css file:
header > h1 {
  display: inline-block;
  font-size: 1.2em;
  font-weight: bold;
  border-radius: 1em;
  background-color: #000a;
  color: #fff;
  padding: 0.3em 0.6em;
  border: 1px solid #fffa;
}

STEP 12:Stylizing the Link Buttons
Let's first create the pill-shaped container for the link buttons.
- Create a CSS declaration block for
ul > liin the style.css file:
ul > li {
  background-color: #fff;
  backdrop-filter: blur(10px) saturate(160%) contrast(180%);
  -webkit-backdrop-filter: blur(10px) saturate(160%) contrast(180%);
  border-radius: 10em;
  padding: 1em;
  margin: 1.4em 0;
  box-shadow: rgb(28 32 93 / 24%) 0px 2px 8px 0px;
}
- Just above that declaration, create the CSS declaration block for
ul:
ul {
  box-sizing: border-box;
  list-style: none;
  margin: 0 auto;
  padding: 2em;
  max-width: 480px;
}
- Below the CSS declaration block for ul > li, create another CSS declaration block for
ul > li > a:
ul > li > a {
  display: flex;
  flex-direction: row;
  justify-content: center;
  align-items: center;
  gap: 0.5em;
}
- Lastly, create a CSS declaration block for
a:
a {
  text-decoration: none;
  color: #000;
}
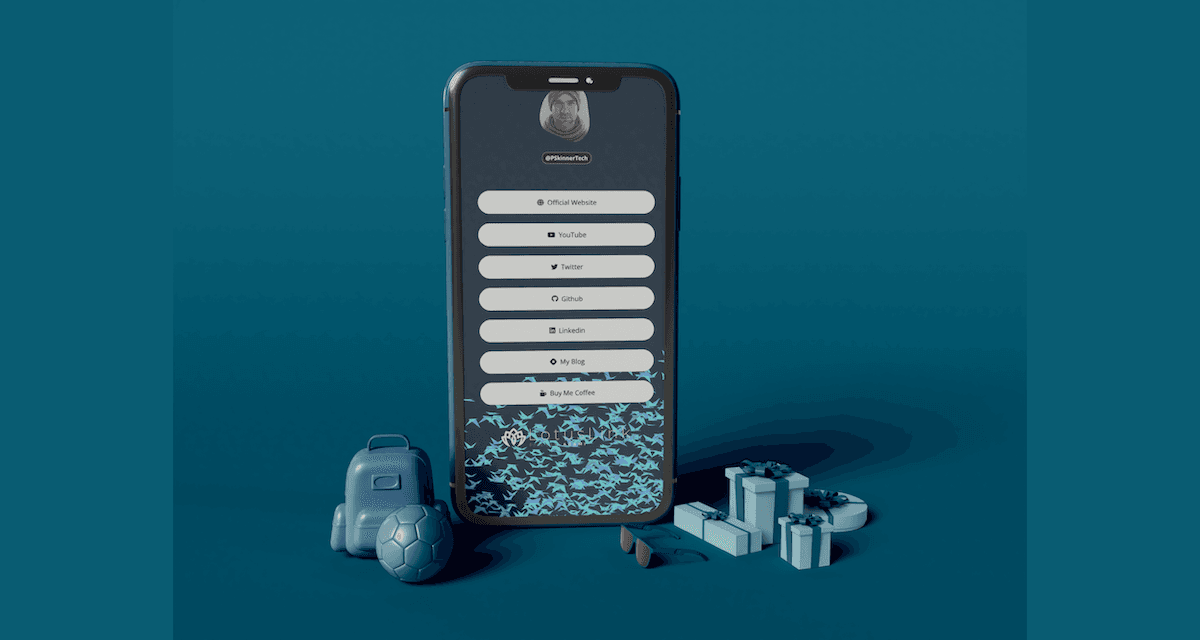
The final result should look like this:

STEP 13:Stylizing the Background with Vanta.js Motion Graphics
Let's create a background that has paper birds flying in a dark background and are responsive to mouse movement.
- Create a new CSS declaration box in your style.css file:
body {
  background: #000;
  background-size: cover;
}
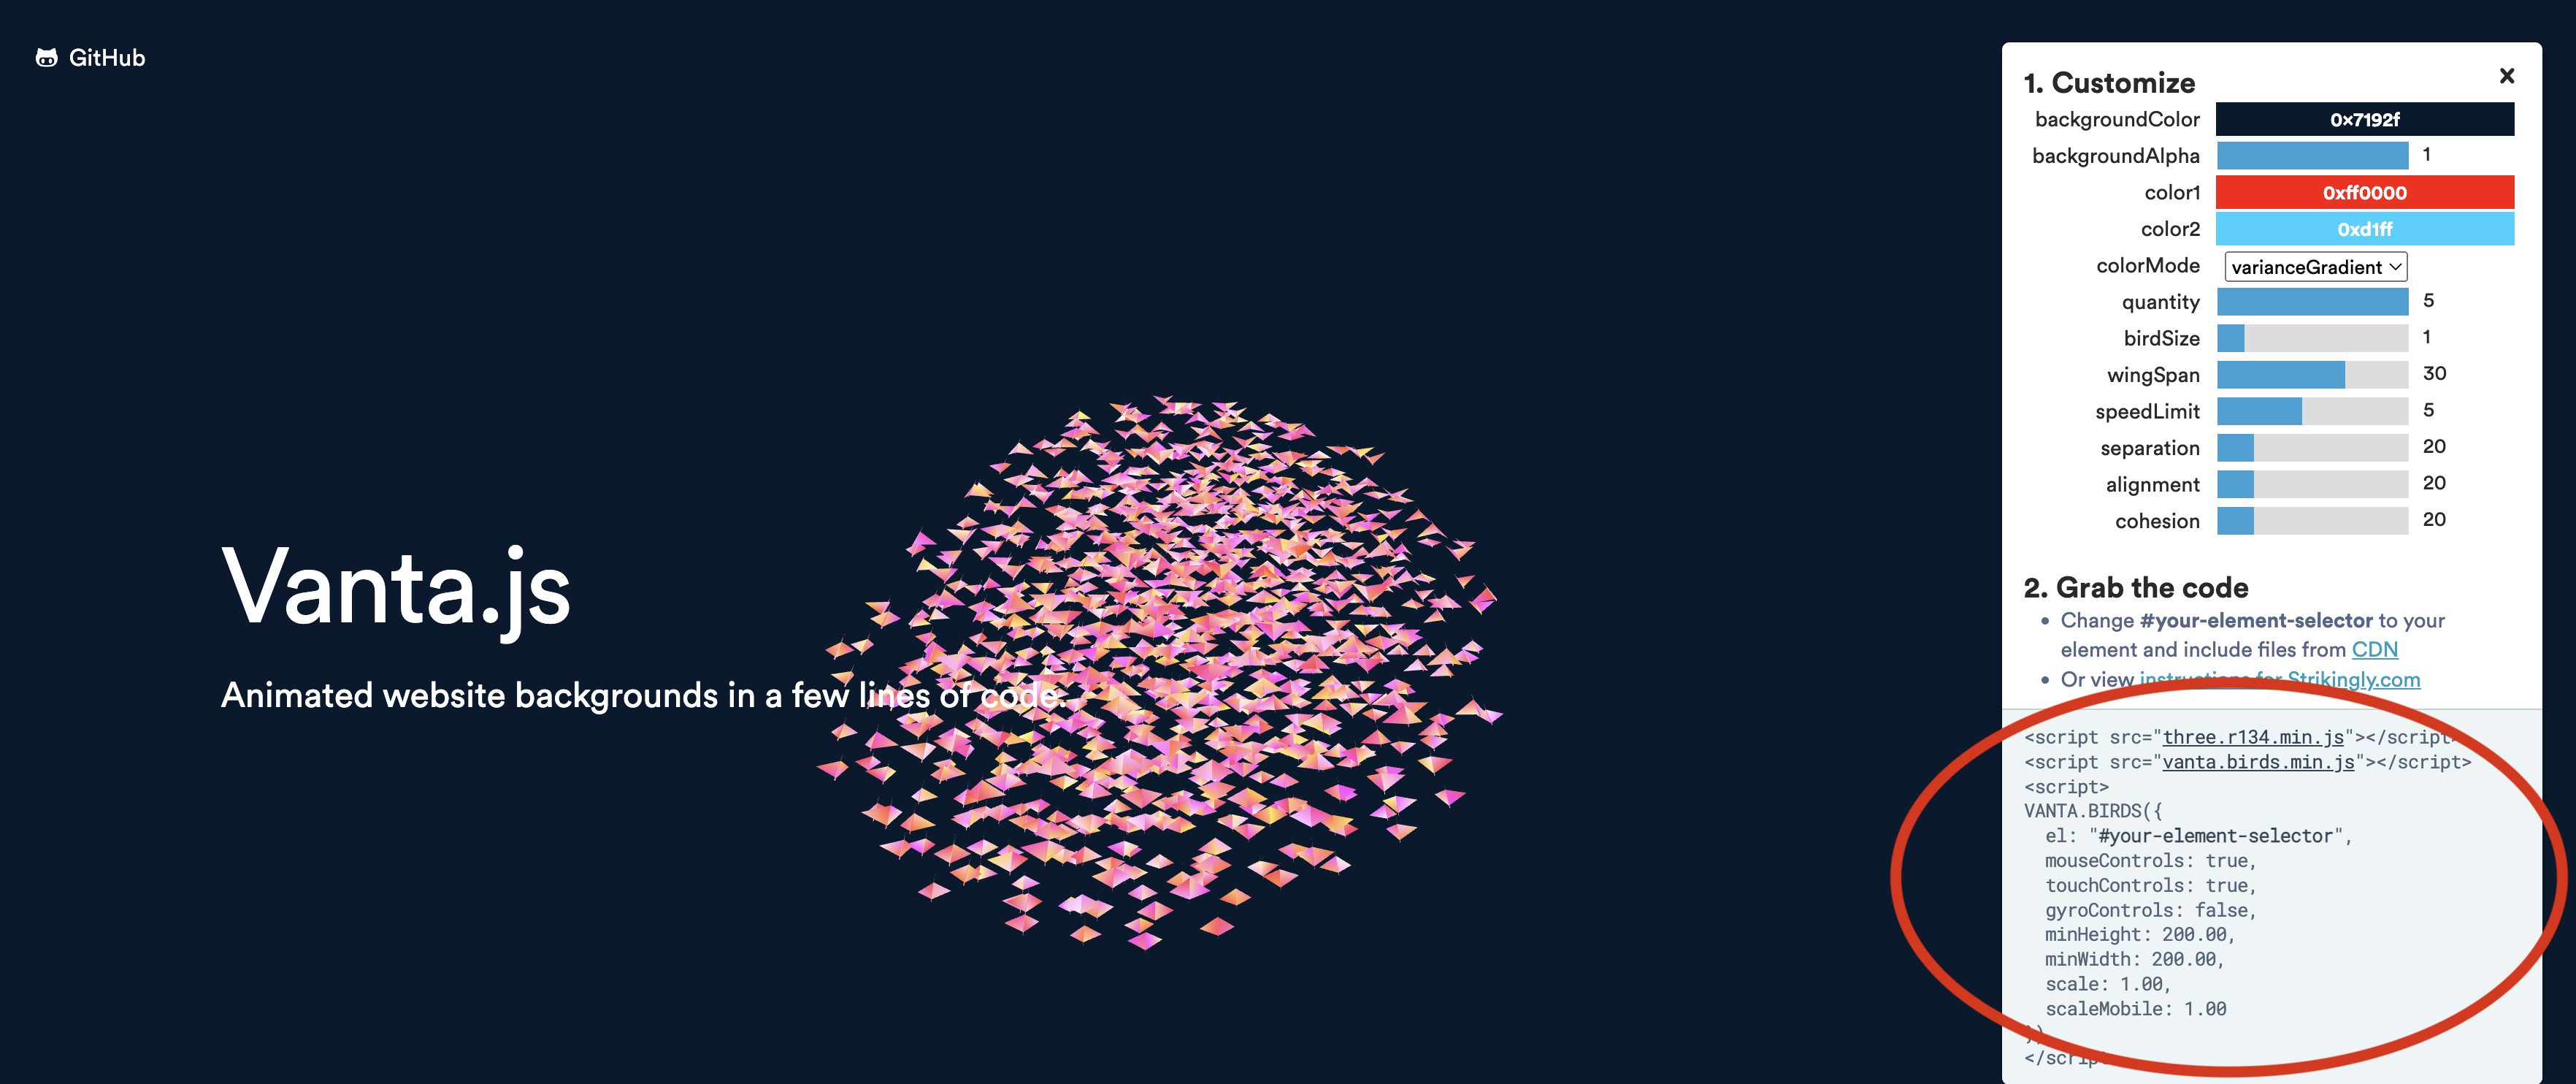
Go to this website: https://www.vantajs.com/
In the design navbar on the right of the screen, change the colors however you want them to be. Once done, copy the code from the bottom of the design navbar.
FOLLOW THESE NEXT STEPS VERY CAREFULLY
Go back to your text editor and into your index.html file.
Within your <head> tags, paste the code. under the other elements.
  <head>
    <meta charset="utf-8" />
    <title>Patrick Skinner - "Doc"</title>
    <meta name="'viewport" content="width=device-width, initial-scale=1" />
    <link rel="stylesheet" href="style.css" />
    <link
      rel="stylesheet"
      href="https://cdnjs.cloudflare.com/ajax/libs/font-awesome/6.3.0/css/all.min.css"
      integrity="sha512-SzlrxWUlpfuzQ+pcUCosxcglQRNAq/DZjVsC0lE40xsADsfeQoEypE+enwcOiGjk/bSuGGKHEyjSoQ1zVisanQ=="
      crossorigin="anonymous"
      referrerpolicy="no-referrer"
    />
    <script src="three.r134.min.js"></script>
    <script src="vanta.birds.min.js"></script>
    <script>
      VANTA.BIRDS({
        el: "#your-element-selector",
        mouseControls: true,
        touchControls: true,
        gyroControls: false,
        minHeight: 200.0,
        minWidth: 200.0,
        scale: 1.0,
        scaleMobile: 1.0,
      });
    </script>
  </head>
With this code added, it will not work until you change the
srclinks. Go back to the Vanta.js website, right-click each link from the code snippet, and select "Copy Link Address".Go back to your text editor and into your index.html file. Paste the new link to the appropriate
scripttag.
    <script src="https://cdnjs.cloudflare.com/ajax/libs/three.js/r134/three.min.js"></script>
    <script src="https://cdn.jsdelivr.net/npm/vanta@latest/dist/vanta.birds.min.js"></script>
    <script>
YOU'RE DONE!
Congratulations! Let me know what you think of this build. Feel free to post questions in the comments.